Thursday, 30 July 2015

Crepe paper flowers

I found this video on YouTube of making flowers out of crepe paper streamers. Its titled 'How to make paper flowers out of crepe streamers/DIY Valentine's day craft'.

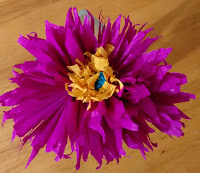
This is my recreation of it. The instructions on the video are very clear.

I did not get crepe streamers so i had to cut out strips from crepe paper. If you get crepe streamers it would be better since you will get straight lines. In the 3rd picture were i have arranged the pink flower make sure to pull the thread tightly to get the petals more closer. I did not do that so the petals in my flower have spread a little bit. The outcome is good either way :).


Tuesday, 28 July 2015

Paper Gun

I came across this video from YouTube whose name is crazyPT who makes different types of guns from paper. Most of his videos look complicated and he usually fast forwards it so it takes time to follow the instructions. I wanted to make a paper gun and looked at all his videos and tried to replicate the one that i thought was least complicated. He has fast forwarded this one and there are no instructions as such so had to pause it several times and also has to see the comments for measurements.

I tried to follow it as much as much as possible and finally was able to make a working paper gun that shoots.

I have written down the instructions as a video tutorial would be better for this one to follow. Just go to YouTube and type 'How to make Paper Gun that Shoots-With Trigger' and click the one under the name crazyPT.

All you need is paper, rubber band, glue gun and scissors for this one.

My paper gun looked liked this


And yes it works!!!! Check out the video


Monday, 27 July 2015

Boomerang

Paper is perhaps the most widely used material for art and craft. It is available in different varieties, colors and lots of techniques can be used on it.

Origami has always interested me. Some of them are easy to do and some really need a little bit of practice. I decided to make a boomerang out of and A4 sheet paper. I wanted to see if it really worked as shown by some of the videos i saw.

So i followed the exact instructions of this particular youtube video and was pretty pleased with my efforts. The link to the video is below:

https://www.youtube.com/watch?v=_kprLtErg8U

The boomerang that i made looked like this


I tried to take a video but was not able to shoot it very well. The boomerang works well though.

I will try and take a better one soon.


Wednesday, 22 July 2015

Snowflake

You need the following items:
A glue gun
Popsicle sticks
Glitter
Thread
 

 Take 4 Popsicle sticks and decorate them. I painted mine and used glitter and decorative stickers.


Arrange the Popsicle sticks so that they form a shape like a snowflake. Stick them together using hot glue. Attach a thread to the back and hang it.


Thursday, 16 July 2015

Mini Bookshelf

I had lot of empty boxes and was thinking of throwing them when i thought why not try and turn them into something useful.
This particular box was appropriate for a mini bookshelf or a storage drawer.
 

You need the following items:
-An empty box
-Cardboard pieces
-A glue gun
-Pipecleaner
 

 1. Take the empty box and cut out the top flap. If you want an open shelf cut out all the flaps. I wanted to make a door so i cut only the top flap.


2. Take 3 cardboard pieces. The first one should be equal to the length of the box. The other two should be half the height of the box.


3. Hot glue the two cardboard pieces on each lower end of the box across the width. Then hot glue the last cardboard piece across the length in the middle and above the two cardboard pieces. This will create a shelf.


4. If you want more shelves just add more cardboard pieces along the height of the box.

I wanted a door so i did not cut the other two flaps. I made a hook using pipecleaners to close the door.
 

Your mini bookshelf is ready.


I did not have any decorative papers. But to make it look better wrap it in gift wrapping or decorative paper.


Monday, 13 July 2015

Paper mache planet using balloon

My daughter has been learning about the solar system in her class and so i thought about making a planet for her using a balloon and paper mache. Well it gets messy but it was a lot of fun and my daughter enjoyed every minute of it.

You need the following items:
1 balloon
All purpose flour
Water
Newspaper
Paint

1. To make the paper mache i took 1 part of all purpose flour and 1 part of water and mixed it together to get a smooth consistency.


2. Make strips of the newspaper. Place your blown balloon over a cup or a bowl so that it will be easier to place the strips of paper.


3. Take a strip and completely dip it in the mixture and place it over the surface of the balloon. Repeat the process until the entire balloon is covered. I placed to coats of paper to make it sturdier.

This process will get messy so place a newspaper under your work area.


4. Leave the balloon overnight or in the sun to dry.
 

 5. Once it is dry take a pin and blow the balloon. You can make a small hole and remove the balloon.

6. We made planet Earth so my daughter painted it green and blue.

Keep it to dry and your planet is ready.


Monday, 6 July 2015

Photo Frame using Popsicle Sticks

There are lots of posts on how to make photo frames on the net. I wanted my frame to stand and also have the option of being able to change the photographs. The photo frame that i am going to make will fit photo of size 4x6".

You will need the following items:
1. A glue gun
2. Jumbo size popsicle sticks
3. Decorative stickers
 

 Take 4 Popsicle sticks. Stick 2 of them together only on the top and bottom. Do the same for the next 2 of them. I did not stick the entire length of the Popsicle together so that i can pass my photo through them.


Take another two Popsicle and stick them accross, one on top and one below.


Take another two and stick them straight so as to cover the red sticks. Lastly stick another two purple Popsicle sticks across slightly below the first purple sticks. Between the two red Popsicle there is just enough space to slide it on the base. This will be your photo frame.


To make the stand take 3 Popsicle sticks and stick them together.


Stick another two Popsicle sticks on top of the three leaving just enough space between them which is about the thickness of the stick. Hot glue another Popsicle stick on its side and stick it in the groove between the two Popsicle sticks. The base is ready and this will hold your photo frame.


Slide your photo frame on the base. Decorate it with stickers or glitters and your Photo frame using Popsicles is ready. The best part is that you can always remove replace your photograph whenever you want. As simple as that.


Sunday, 5 July 2015

Sliding Door Barn using Popsicle Sticks

This project took a little bit of time for me. I tried to recreate one of the YouTube videos that i saw. Just type ' How to make a Schleich Stall with Sliding Door and Wood Flooring' in YouTube.

The girl in the video has explained quite clearly how to go about making the stall.This is my recreation of it. My daughter has a lot of farm animal toys lying around so i decided to make a barn for her so that she could keep all of them in one place and play with it.
 

You need the following items:
1. A glue gun
2. Popsicle Sticks
3. Scissors
4. A cardboard

First i made the stalls for the barn by sticking popsicle sticks as shown below in the pictures. I made 6 of them in total.


Then stick 5 of them together to form a rectangle shape. Stick them onto the cardboard.


To make a sliding door first i need to railings. To make the railings take popsicle sticks and stick them as straight as possible to the length of the cardboard. Make 6 of them in total. Take 3 and stick them together as shown below. Do the same to the next 3 and you should get two railings as shown below.


Stick one railing on top and one below as shown. Slide the remaining stall and close the edges. You should be able to slide the door.


Now your barn is ready.


Wednesday, 1 July 2015

Popsicle Stick Mobile Holder

All you need are Popsicle sticks to make the mobile holder and any decorative items like glitter, jewels to make it look more fancy.
I made my mobile holder in the shape of a chair.

Make a base with Popsicle sticks. I took about 8 of them. Stick another Popsicle stick across the base.


Make another base of sticks which will hold your mobile and make two side arms. Stick them together to make a chair.


Catapult using Popsicle Sticks

My next project is a catapult using Popsicle Sticks. My daughter loved it and used it as a toy.

You need the following items:
1. Popsicle Sticks
2. Rubber bands

Take about 8 Popsicle sticks and tie two rubber bands at each ends of the sticks so that it looks like this:


Take another Popsicle stick and place it in between the last and second last stick. Take another one and place it at the top. Use a rubber band to tie both the ends of the sticks. Final product will look like this:


That's it, your catapult is ready!!!!!!!!!!

Crafts

I have categorized the crafts according to the materials i have used.
 

Balloon   
Cardboard   
Paper   
Popsicle Sticks

Fun Projects