
Materials required:
1. 2 Geared motors
2. 2 AA batteries and battery holder
3. Mini breadboard
4. 4 jumper wires
5. 2 Popsicle sticks
6. 2 Small rubber balls or Cork
7. Double sided adhesive foam
8. Glue gun or Super glue
1. If you can find geared motors with wires that are already connected you can skip this step. If not connect your jumper wires to the geared motors. Usually jumper wires come with pins at both the ends. I cut the pin from one end and removed the casing to expose the wire. Connect the exposed wires to your geared motors.

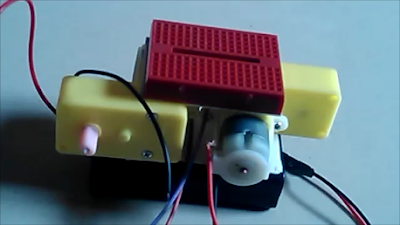
2. Put AA batteries into the battery holder. Stick some adhesive foam on the cover of the battery pack and place your motors on it as shown. Make sure not to stick on the ON/OFF switch.

3. Take the mini breadboard and stick it on top of the motors as shown. Before sticking make sure all the wires are on the same side. This will make it easier while making the wire connections.
4. Now lets start connecting the motors to the battery. Start with the battery connection. If you do not know how to use a breadboard or want to know more about it please Click Here.
Moving on, before you start connecting anything make sure your battery is switched off.
Connect the black wire into first row first column, Connect the red wire into first row last column as shown below.

Next lets move onto the motors. You can choose any one. I started with the left one. As you can see in the pic below the jumper wires for the left motor are red and purple in color. Yours could be different.
Connect the purple jumper wire(yours could be black) into second row first column(right in front of the black wire of the battery pack)
Connect the red jumper wire into second row last column(right in front of the red wire of the battery pack)
 Once done switch on the battery and check if the motor is running.
Now connect the second motor. Connect the black jumper wire into third row last column
(right in front of the red jumper wire of first motor)
Connect the red jumper wire into the third row first column (right in front of the purple jumper wire of first motor)
 Once you have completed the connections switch on the battery to make sure both the motors are running.
5. Next step is to make the legs of the robot. I have taken two small rubber balls and poked holes on
one side of both the balls.Firmly press the motor shaft into the hole that was made in the ball. While testing the legs kept falling out because the rubber balls kept coming out of the shaft.So i used some super glue to make sure the ball does not move from the shaft.
If you can get a cork instead of a ball it would be more sturdier as i found out later.

6. Take two Popsicles sticks and using a glue gun stick each of them to the two rubber balls as shown. To make it more sturdy i used masking tape to secure the popsicle stick to the ball.
 7. Thats it. Switch on the battery and watch your robot dance
If you prefer the video tutorial watch it below.
1. 2 Geared motors
2. 2 AA batteries and battery holder
3. Mini breadboard
4. 4 jumper wires
5. 2 Popsicle sticks
6. 2 Small rubber balls or Cork
7. Double sided adhesive foam
8. Glue gun or Super glue
1. If you can find geared motors with wires that are already connected you can skip this step. If not connect your jumper wires to the geared motors. Usually jumper wires come with pins at both the ends. I cut the pin from one end and removed the casing to expose the wire. Connect the exposed wires to your geared motors.

2. Put AA batteries into the battery holder. Stick some adhesive foam on the cover of the battery pack and place your motors on it as shown. Make sure not to stick on the ON/OFF switch.

3. Take the mini breadboard and stick it on top of the motors as shown. Before sticking make sure all the wires are on the same side. This will make it easier while making the wire connections.

4. Now lets start connecting the motors to the battery. Start with the battery connection. If you do not know how to use a breadboard or want to know more about it please Click Here.
Moving on, before you start connecting anything make sure your battery is switched off.
Connect the black wire into first row first column, Connect the red wire into first row last column as shown below.

Next lets move onto the motors. You can choose any one. I started with the left one. As you can see in the pic below the jumper wires for the left motor are red and purple in color. Yours could be different.
Connect the purple jumper wire(yours could be black) into second row first column(right in front of the black wire of the battery pack)
Connect the red jumper wire into second row last column(right in front of the red wire of the battery pack)

Now connect the second motor. Connect the black jumper wire into third row last column
(right in front of the red jumper wire of first motor)
Connect the red jumper wire into the third row first column (right in front of the purple jumper wire of first motor)

5. Next step is to make the legs of the robot. I have taken two small rubber balls and poked holes on
one side of both the balls.Firmly press the motor shaft into the hole that was made in the ball. While testing the legs kept falling out because the rubber balls kept coming out of the shaft.So i used some super glue to make sure the ball does not move from the shaft.
If you can get a cork instead of a ball it would be more sturdier as i found out later.

6. Take two Popsicles sticks and using a glue gun stick each of them to the two rubber balls as shown. To make it more sturdy i used masking tape to secure the popsicle stick to the ball.

If you prefer the video tutorial watch it below.
No comments:
Post a Comment