Showing posts with label toy. Show all posts

Friday, 14 September 2018

Rocking Bird DIY

Materials

1. Foam
2. Safety pins (2)
3. A nail
4. Small circle made of cardboard
5. Small piece of steel wire
6. Toothpick
7. Drawing of a bird made from paper
8. Glue

Method:

1. Open both the safety pins wide and make sure the space between them is the same.

2. Push the safety pin to one end of a foam piece and the second pin on the other end.

3. Next take the circle made out of cardboard and make a hole in the center.

4. Push the steel wire in the center of the circle.

5. Next push the nail in the side of the circle as shown. This will provide the weight.

6. Draw a bird and its wing separately out of paper and cut it out.

7. Take the wing and put glue on its side and stick it in the middle of the bird. Make sure not to put glue in the center of the wing. The toothpick will be passed through here.Once the sides are stuck put the toothpick through the center of the wing.

8. Push the other end of the toothpick on the opposite side of the nail as shown.

9. Pass the steel wires through the loops of the safety pins keeping the bird in the center.

10. As simple as that. Tilt the bird forward and let it go. The bird will oscillate back and forth for a short time.




Wednesday, 15 February 2017

CD Boomerang Car


Hi guys,
So i am blogging after a while now and i while browsing YouTube i came across this video on the channel Project your mind that shows you how to make a Boomerang Car out of materials that would be readily available at your home. So i thought of trying it and in 10min i was done. It was that easy. So lets get started.
Materials:
1. Old CD's or DVD'd
2. 2 Rubber bands
3. A Popsicle stick
4. 2 cardboard strips
5. 4 to 5 bolt nuts
6. Hot glue
Method:
1.Take the two rubber bands and loop them so that it knots in the middle as shown.


2.Take the bolt nuts and loop them in the rubber bands. After all the bolts are looped tie both the rubber bands in a knot so that the bolts cannot slip out.


3. Take the cardboard strip and place the rubber band as shown. With a pencil mark the end of the rubber band and cut the cardboard strip there. Cut another strip of same length.


4. With the help of a glue gun stick both the cardboard strips as shown.


5. Take a Popsicle stick and cut it in half.


6. Take the rubber band and loop it through the holes of the CD.Place the Popsicle stick on the outer side of the CD through the rubber band so that both the bands do not move. Stick the Popsicle stick in place with glue gun.


7. Decorate it as you want and roll it around.


Check it out in action


Tuesday, 25 August 2015

Balloon CD Hovercraft

This is a very simple toy/experiment to make. The items needed for this will surely be there with you at home. I have seen a lot of posting on the internet about this so had to try it out. So lets begin.
 

 You need the following items:
1. An old CD
2. A baloon
3. A water/juice/soda bottle cap
4. Push pin or needle
5. Hot glue or Feviquick

Take the water bottle cap and make a few holes on it. I used a push pin to make the holes. Please make sure that this is done by an adult.


Use hot glue to stick the bottle cap to the center of the CD over the hole. Put the lip of the baloon over the edge of the bottle cap. You can inflate it through the holes or you can inflate the balloon first and then put it over the edge of the cap. I found this difficult so used the first method.


Once you inflate the balloon just let it go on the floor or any flat surface. The hovercraft should glide through.

Check out how mine worked.


Wednesday, 5 August 2015

Popsicle Stick Gun

About 2 weeks ago i made a paper gun with trigger. It does work but is not very sturdy. Atleast the one i made was not sturdy. My daughter loved paying with it but after about 2 days the trigger started to bend and tear and it became impossible to use it. So i thought of making another one but this time with Popsicle Sticks so that it would be more sturdy and this one works beautifully.

So lets start.

You need the following items:
Popsicle Sticks (About 6 to 8)
Scissors
2 rubber bands
Hot glue gun

1. Take a Popsicle Stick and hot glue another 2 sticks one on top and the other at the bottom at about half way of the first one as shown below.


2. To make the trigger take another Popsicle stick and cut to about the size you are comfortable to pull. Slide it through the 2 Popsicle sticks and secure it with a rubber band. This will be your trigger.


3. Next step is to make the handle. Take another Popsicle stick and hot glue it to the end of the 2 Popsicle sticks. Stick it so that its slightly slant.


4. Now for your bullet. Cut a v-shape at the edge of the first Popsicle.


5. You can add another 2 Popsicle sticks at the top and bottom to make the gun more sturdy.


6. For your bullet attach a rubber band through the v-shape and the top of the trigger as shown below.


And there it is!! Your Popsicle stick gun is ready. Let's see it in action.

Monday, 27 July 2015

Boomerang

Paper is perhaps the most widely used material for art and craft. It is available in different varieties, colors and lots of techniques can be used on it.

Origami has always interested me. Some of them are easy to do and some really need a little bit of practice. I decided to make a boomerang out of and A4 sheet paper. I wanted to see if it really worked as shown by some of the videos i saw.

So i followed the exact instructions of this particular youtube video and was pretty pleased with my efforts. The link to the video is below:

https://www.youtube.com/watch?v=_kprLtErg8U

The boomerang that i made looked like this


I tried to take a video but was not able to shoot it very well. The boomerang works well though.

I will try and take a better one soon.


Sunday, 5 July 2015

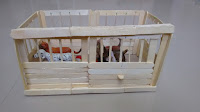
Sliding Door Barn using Popsicle Sticks

This project took a little bit of time for me. I tried to recreate one of the YouTube videos that i saw. Just type ' How to make a Schleich Stall with Sliding Door and Wood Flooring' in YouTube.

The girl in the video has explained quite clearly how to go about making the stall.This is my recreation of it. My daughter has a lot of farm animal toys lying around so i decided to make a barn for her so that she could keep all of them in one place and play with it.
 

You need the following items:
1. A glue gun
2. Popsicle Sticks
3. Scissors
4. A cardboard

First i made the stalls for the barn by sticking popsicle sticks as shown below in the pictures. I made 6 of them in total.


Then stick 5 of them together to form a rectangle shape. Stick them onto the cardboard.


To make a sliding door first i need to railings. To make the railings take popsicle sticks and stick them as straight as possible to the length of the cardboard. Make 6 of them in total. Take 3 and stick them together as shown below. Do the same to the next 3 and you should get two railings as shown below.


Stick one railing on top and one below as shown. Slide the remaining stall and close the edges. You should be able to slide the door.


Now your barn is ready.


Wednesday, 1 July 2015

Catapult using Popsicle Sticks

My next project is a catapult using Popsicle Sticks. My daughter loved it and used it as a toy.

You need the following items:
1. Popsicle Sticks
2. Rubber bands

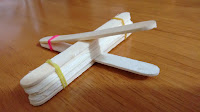
Take about 8 Popsicle sticks and tie two rubber bands at each ends of the sticks so that it looks like this:


Take another Popsicle stick and place it in between the last and second last stick. Take another one and place it at the top. Use a rubber band to tie both the ends of the sticks. Final product will look like this:


That's it, your catapult is ready!!!!!!!!!!