Showing posts with label paper. Show all posts
Showing posts with label paper. Show all posts
Thursday, 3 August 2017
Thursday, 18 August 2016
Cereal box stationary organizer
Do you have a lot of empty cereal boxes which you want to recycle? Converting them into a stationary organizer or drawers is a good way to reuse them.
You need the following items:
1. Cereal boxes of different sizes/biscuit box/soap covers
2. Paint
3. Color paper
4. Glue
5. Decorative tapes/embellishments
1. Take the Cereal box and cut all the extra flaps. I have used biscuit cover and soap covers too for this project. I have cut slanting lines from the top of the boxes on both sides to give the boxes a shape. You can leave them as it is if you want.

2. To make the boxes a little more sturdy i covered it with pieces of newspaper and stuck them with a glue paste made out of equal amounts of glue and water. Once done leave them to dry. Once they are fully dry you can either paint them or just cover it with decorative paper. I did both.

3. Now its time to arrange them. Since i had boxes of different sizes i decided to place them according to their heights. You can arrange them in whichever way you like. I used some color tape and embellishments to decorate it.

4. Put you craft accessories or stationary accessories and your organizer is ready.

You need the following items:
1. Cereal boxes of different sizes/biscuit box/soap covers
2. Paint
3. Color paper
4. Glue
5. Decorative tapes/embellishments
1. Take the Cereal box and cut all the extra flaps. I have used biscuit cover and soap covers too for this project. I have cut slanting lines from the top of the boxes on both sides to give the boxes a shape. You can leave them as it is if you want.

2. To make the boxes a little more sturdy i covered it with pieces of newspaper and stuck them with a glue paste made out of equal amounts of glue and water. Once done leave them to dry. Once they are fully dry you can either paint them or just cover it with decorative paper. I did both.

3. Now its time to arrange them. Since i had boxes of different sizes i decided to place them according to their heights. You can arrange them in whichever way you like. I used some color tape and embellishments to decorate it.

4. Put you craft accessories or stationary accessories and your organizer is ready.

Wednesday, 13 July 2016
Fun Paper Project
So guys i am a little confused as to what name i can give to this project. It is a fun project that uses a DC motor, an on/off switch, fan and paper. I reused the motor and fan from the Wiggle bot project. The only extra thing you need is a small piece of cardboard and some sketch pens. So lets get started.
You need the following things:
1. DC motor
2. Fan
3. On/Off switch
4. Small piece of cardboard
5. A base to hold the motor. You can use a small cardboard box
1. Connect the DC motor to the On/Off switch and place the fan on the motor. I used a thermacol as a base for the motor but it kept falling off when i switched on the motor. So use a stronger base to hold the motor.

2. Place the fan on the motor and put a double sided foam tape on the fan Place the cardboard piece on the fan.

3. Switch on the motor and use your sketch pen to make cool designs
You need the following things:
1. DC motor
2. Fan
3. On/Off switch
4. Small piece of cardboard
5. A base to hold the motor. You can use a small cardboard box
1. Connect the DC motor to the On/Off switch and place the fan on the motor. I used a thermacol as a base for the motor but it kept falling off when i switched on the motor. So use a stronger base to hold the motor.

2. Place the fan on the motor and put a double sided foam tape on the fan Place the cardboard piece on the fan.

Thursday, 5 May 2016
Paper Rosette
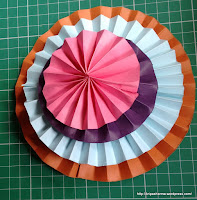
Hi guys. Paper Rosettes are very simple to make and can be used to decor your wall or be used in part decorations. You could also use them to make paper hangings.
You need the following things:
1. Different color paper
2. Glue or hot glue
3. Paper cutter
4. Pencil and ruler
1. I have made 4 rosettes so i have taken 4 different color papers. The four papers have sizes of 1.5inch, 2inch, 2.5inch and 3inch width. The length is 12inches for all four. As i moved onto the 2.5inch wide paper i noted that with 12inches length the paper could not be folded into a circle so i used another strip of 2.5inch x 12inch. So you will need two strips for the 2.5inch and 3inch wide rosettes.

2. Take the first strip which is 1.5inch x 12inch and mark at 1/4inch all through the length of the strip.

3. Fold the strip in accordion style. To make it easier and even you can score at each 1/4 and then fold.

4. Stick the 2 ends of the paper with glue or hot glue.

5. Slowly bring the paper together and press it towards the center. Put hot glue at the center so that the paper sticks together. To make it more secure you can also stick another paper at the back. I punched out a circle in another paper and stuck it in the middle at the back. The Paper Rosettes are ready.


6. Repeat the above steps with the remaining strips of paper. As i have mentioned in Step 1, the 2.5inch and 3inch strips will need an extra strip of paper each.


You need the following things:
1. Different color paper
2. Glue or hot glue
3. Paper cutter
4. Pencil and ruler
1. I have made 4 rosettes so i have taken 4 different color papers. The four papers have sizes of 1.5inch, 2inch, 2.5inch and 3inch width. The length is 12inches for all four. As i moved onto the 2.5inch wide paper i noted that with 12inches length the paper could not be folded into a circle so i used another strip of 2.5inch x 12inch. So you will need two strips for the 2.5inch and 3inch wide rosettes.

2. Take the first strip which is 1.5inch x 12inch and mark at 1/4inch all through the length of the strip.

3. Fold the strip in accordion style. To make it easier and even you can score at each 1/4 and then fold.

4. Stick the 2 ends of the paper with glue or hot glue.

5. Slowly bring the paper together and press it towards the center. Put hot glue at the center so that the paper sticks together. To make it more secure you can also stick another paper at the back. I punched out a circle in another paper and stuck it in the middle at the back. The Paper Rosettes are ready.


6. Repeat the above steps with the remaining strips of paper. As i have mentioned in Step 1, the 2.5inch and 3inch strips will need an extra strip of paper each.


Tuesday, 8 March 2016
How to make a Clock from Paper Plate
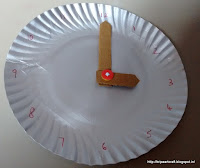
You make a toy clock as fancy as you want or keep it just simple. I made a very simple one for my daughter who is learning about time in school.
You need the following things:
1. Paper plate
2. Cardboard to make the hour and minute hands
3. Paper fastener
4. Marker pen
1. Take the paper plate and write the numbers from 1 to 12. Mark the center of the plate. I realized after looking at the picture that the numbers are small and not visible from far. So take a marker pen and make the numbers big and dark.

2. Take cardboard and cut out two sticks to the right lengths to make the hour and the minute hands.

3. Take the paper fastener and put it through the minute hand first, then the hour hand and finally push it through the center of the paper plate. Fastener the clip behind the plate. Your clock is ready now.

You need the following things:
1. Paper plate
2. Cardboard to make the hour and minute hands
3. Paper fastener
4. Marker pen
1. Take the paper plate and write the numbers from 1 to 12. Mark the center of the plate. I realized after looking at the picture that the numbers are small and not visible from far. So take a marker pen and make the numbers big and dark.

2. Take cardboard and cut out two sticks to the right lengths to make the hour and the minute hands.

3. Take the paper fastener and put it through the minute hand first, then the hour hand and finally push it through the center of the paper plate. Fastener the clip behind the plate. Your clock is ready now.

How to make a Magic Paper Fan
My daughter has been doing a lot of crafts in her school. One of them was a simple fan that had two sticks with which you could open or close the fan. With regular use it tore off and she asked me to do another one. I thought how about make it a little different this time.
You need the following things:
1. Two Colored papers of 60cm x 10cm and 6cm x 6cm
2. An A4 size sheet
3. Thread
4. Straw
5. Sticky Tape
6. Glue

1. Take the 60cm x 10cm colored paper and form 1/2inch accordion pleats with it to form the fan shape.

When you fold the above pleats together you will be able to form a fan shape.

2. At the two ends of the fan stick a thread with glue on the back side.

3. Take the A4 sheet paper and taking the straw or a pencil shape as reference roll the paper to form a tube. Trim the ends. The ends of the folded fan will be put through this tube so make sure it will go through.

4. Take the 6cm x 6cm colored paper and using the above tube roll the paper to form a slightly bigger size tube.

The size should be such that the white tube will go through the purple tube.

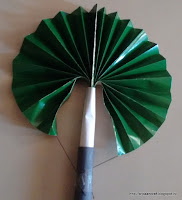
5. Now that all the elements are done, lets arrange them. Take the fan and fold it. Push the end which does not have the threads inside the white tube. Put glue at the end to make sure the fan wont come out.

6. Next take the purple tube and push it through the white tube. Pull both the threads towards the purple tube and stick them to it using a sticky tape.

That's it, your magic paper fan is ready. Check it out in action!!!

Hope you liked it. Please do make your own and enjoy.
You need the following things:
1. Two Colored papers of 60cm x 10cm and 6cm x 6cm
2. An A4 size sheet
3. Thread
4. Straw
5. Sticky Tape
6. Glue

1. Take the 60cm x 10cm colored paper and form 1/2inch accordion pleats with it to form the fan shape.

When you fold the above pleats together you will be able to form a fan shape.

2. At the two ends of the fan stick a thread with glue on the back side.

3. Take the A4 sheet paper and taking the straw or a pencil shape as reference roll the paper to form a tube. Trim the ends. The ends of the folded fan will be put through this tube so make sure it will go through.

4. Take the 6cm x 6cm colored paper and using the above tube roll the paper to form a slightly bigger size tube.

The size should be such that the white tube will go through the purple tube.

5. Now that all the elements are done, lets arrange them. Take the fan and fold it. Push the end which does not have the threads inside the white tube. Put glue at the end to make sure the fan wont come out.

6. Next take the purple tube and push it through the white tube. Pull both the threads towards the purple tube and stick them to it using a sticky tape.

That's it, your magic paper fan is ready. Check it out in action!!!

Hope you liked it. Please do make your own and enjoy.
Saturday, 27 February 2016
Paper Butterfly
The 'ArtsnCraft4u' YouTube channel is one of my favorite art and craft video channel. The instructions are very clear and easy to follow. I have done a lot of crafts after following her videos. I made the paper butterfly by following her video instructions. Click the link below:
https://www.youtube.com/watch?v=ABOoKhk5yJ4
All you need are some colorful magazine papers. I made them using magazine as well as color paper.
This is how the butterflies i made turned out.
I stuck them on my daughters cupboard using double sided foam tape.
https://www.youtube.com/watch?v=ABOoKhk5yJ4
All you need are some colorful magazine papers. I made them using magazine as well as color paper.
This is how the butterflies i made turned out.
I stuck them on my daughters cupboard using double sided foam tape.
Tuesday, 29 September 2015
Card Making
A little about Card Making
My fathers birthday is coming up and usually i wish him on the phone and send him a greeting by mail. I still remember when i was young i would always get him a greeting card. He would always feel happy to read the sentiment inside and would display it in the showcase. So for this year i decided to make a card for him. I want it to be special and look good, use the right kind of paper, embellishments, sentiments and tools. So i went on the internet to do a little research and there are so many people into this card making business. I decided to try making one after going through one of the tutorials. If you are a beginner go for a simple one first. When i finally finished my card i realized that its just not the kind of paper that you use that needs to be right but you also need the right kind of tools to make a pretty card. So after doing quite a bit of research i have come up with a list of things or tools you must have or at least have if you are going to turn this into a business or a serious hobby.
1. Paper
Making a card involves a lot of paper. Use the right kind.To make a proper card you need to use Cardstock paper. It is more durable than normal print paper. There are different patterns to it from which you can choose. You can also use Embossed paper, textured paper, etc.
2. Die Cutting Machine
Go to any tutorial for card making and they always use the Die Cutting Machine. A Die Cutting Machine is used to cut out shapes and designs out of paper. Here in India it costs about 8000/- so it is a big investment. You need to buy dies along with it. Invest in it if you are going to turn the card making into a business or will make lots and lots of cards.
3. Cutting Mat
A cutting mat will protect your work area while you are making a card. Since you might be cutting the card a lot it is a good idea to have one.
4. Clear Stamps and inks
Stamps and inks are needed to make a design or put a sentiment on the card. There are lots of varieties and brands that you can choose from.
5. Embellishements
These can be any kind such as glitters, crystals, sequins and even in 3D.They are used to make your card look pretty.
6. Craft Knife
For any small cuts, designs that you can make in hand you can use a craft knife. It can come in handy while cutting shapes out of templates.
So these are some of the basic tools that you need for a successful card making venture.
But what about someone who does not make cards regularly? Is investing in a machine that is hardly going to be used worth it?
This is what i thought while thinking about whether or not i should invest in a die cutting machine. At this moment i will not be making a whole bunch of cards and certainly not looking into this as a business. So how do i make a card without it?
To replace the designs i chose stencils of various kinds. Cut the design using stencils and a craft knife. You could invest in a shape cutter too. Lots of die cut sentiments are available. All you have to do is glue them on your card. So you can make a card without all the expensive tools. I am going to try mine and let you know how it goes.
Till then happy crafting.
Tuesday, 15 September 2015
Paper Basket
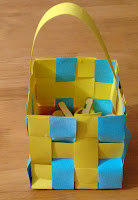
My daughter happened to see an origami basket and told me to make one for her. But i felt it would be too small and she would not be able to fir anything in it. So i decided to make one out of paper for her. A basket out of any material mainly involves weaving which is what i have done. Just get the measurements right and you will have a basket in no time.
You need the following items:
-Paper of different colors ( I used chart paper, for more durability you can use construction paper)
-Glue Gun
1. Cut long strips of chart paper which is about 1 inch wide and 12 inches long. Cut 8 of them in total. I cut 4 of color blue and another 4 of color yellow. This will be used for your base.
Cut another 4 strips of chart paper of any color with measurements of 1 inch wide and 18 inches long. 3 strips will be used for your wall of the basket and another one for the handle.

2. For the base weave the blue and yellow color strip as shown below. Leave equal space at each end.

3. Fold the unweaved strip to the center and glue all the corners.

4. To make the wall we will use the remaining 3 strips. Take a strip and mark it at 4 inches all the way.

5. Fold at each of the 4 inches. Open it and glue the end. You should end up with a square. Repeat for the remaining 2 strips

6. Take the square and weave it to the base. Once you reach the top glue the top strips. Trim all the extra paper. Basket is almost ready.

7. For the handle take the reaming strip and glue it to the middle. Your basket is ready.
I would recommend construction paper for this for more durability but even chart paper is good enough. My daughter puts all her knick knacks in this roams around with it.


You need the following items:
-Paper of different colors ( I used chart paper, for more durability you can use construction paper)
-Glue Gun
1. Cut long strips of chart paper which is about 1 inch wide and 12 inches long. Cut 8 of them in total. I cut 4 of color blue and another 4 of color yellow. This will be used for your base.
Cut another 4 strips of chart paper of any color with measurements of 1 inch wide and 18 inches long. 3 strips will be used for your wall of the basket and another one for the handle.

2. For the base weave the blue and yellow color strip as shown below. Leave equal space at each end.

3. Fold the unweaved strip to the center and glue all the corners.

4. To make the wall we will use the remaining 3 strips. Take a strip and mark it at 4 inches all the way.

5. Fold at each of the 4 inches. Open it and glue the end. You should end up with a square. Repeat for the remaining 2 strips

6. Take the square and weave it to the base. Once you reach the top glue the top strips. Trim all the extra paper. Basket is almost ready.

7. For the handle take the reaming strip and glue it to the middle. Your basket is ready.
I would recommend construction paper for this for more durability but even chart paper is good enough. My daughter puts all her knick knacks in this roams around with it.


Tuesday, 11 August 2015
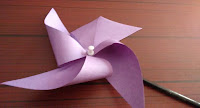
Pinwheel/Windmill
Last weekend we went to a craft mela in town. There were lots of toys made of wood, paper, etc. My daughters eye fell on a windmill. Thanks to it being a windy day it was turning nicely. It was probably the bestseller for the shopkeeper that day.
A windmill or pinwheel is very easy to make at home.
You need the following items:
A square craft paper or origami paper
Scissors
Glue
Push pin
Straw
1. Take a square shape craft paper or origami paper.

2. Draw 2 lines diagonally from one corner to the other. Mark the center.

3. Cut through the line from each corner towards the center but make sure not to cut all the way. Cut till about 3/4th of the line. Repeat for the remaining 3 corners.

4. Take a fold from one corner and glue it to the center. I used a glue gun for this. You can use any glue. Repeat for the remaining 3 corners each time gluing the folds at the center.

5. Take a push pin and make a hole in the center. At the other end push it through the straw.
Your pinwheel or windmill is ready.

The original color of the paper that i took is purple. I have no idea how the first four pictures became blue. Maybe some lighting effect when i took the pictures. :)
Lets see it in action

A windmill or pinwheel is very easy to make at home.
You need the following items:
A square craft paper or origami paper
Scissors
Glue
Push pin
Straw
1. Take a square shape craft paper or origami paper.

2. Draw 2 lines diagonally from one corner to the other. Mark the center.

3. Cut through the line from each corner towards the center but make sure not to cut all the way. Cut till about 3/4th of the line. Repeat for the remaining 3 corners.

4. Take a fold from one corner and glue it to the center. I used a glue gun for this. You can use any glue. Repeat for the remaining 3 corners each time gluing the folds at the center.

5. Take a push pin and make a hole in the center. At the other end push it through the straw.
Your pinwheel or windmill is ready.

The original color of the paper that i took is purple. I have no idea how the first four pictures became blue. Maybe some lighting effect when i took the pictures. :)
Lets see it in action

Subscribe to:
Posts (Atom)

